
⚡ GMapsBook.com is crafted by Jozef Sorocin (🟢 Book a consulting hour) and powered by:
- Spatialized.io (Elasticsearch & Google Maps consulting).
- and Garages-Near-Me.com (Effortless parking across Germany)
Google’s Drawing LibraryThe “pencil” button & mouse cursorThe “trash” buttonThe invisible DrawingManager Detecting changes to the drawn polygonTriggering a dummy searchPutting it all togetherScenario: Freehand DrawingApproachDisabling map interactivityOne-time listenersPolyline eventsTips & Tricks
Once you’ve grasped the concepts behind Dragging & Editing, you can delight your users by letting them draw on your Google map.
Drawing on the map canvas enables a variety of use cases. Your users may want to:
- Emphasize custom region(s) by drawing polygons, just like on KW Honolulu.
- “Clip” neighborhoods or buildings out of the basemap, just like with Felt.
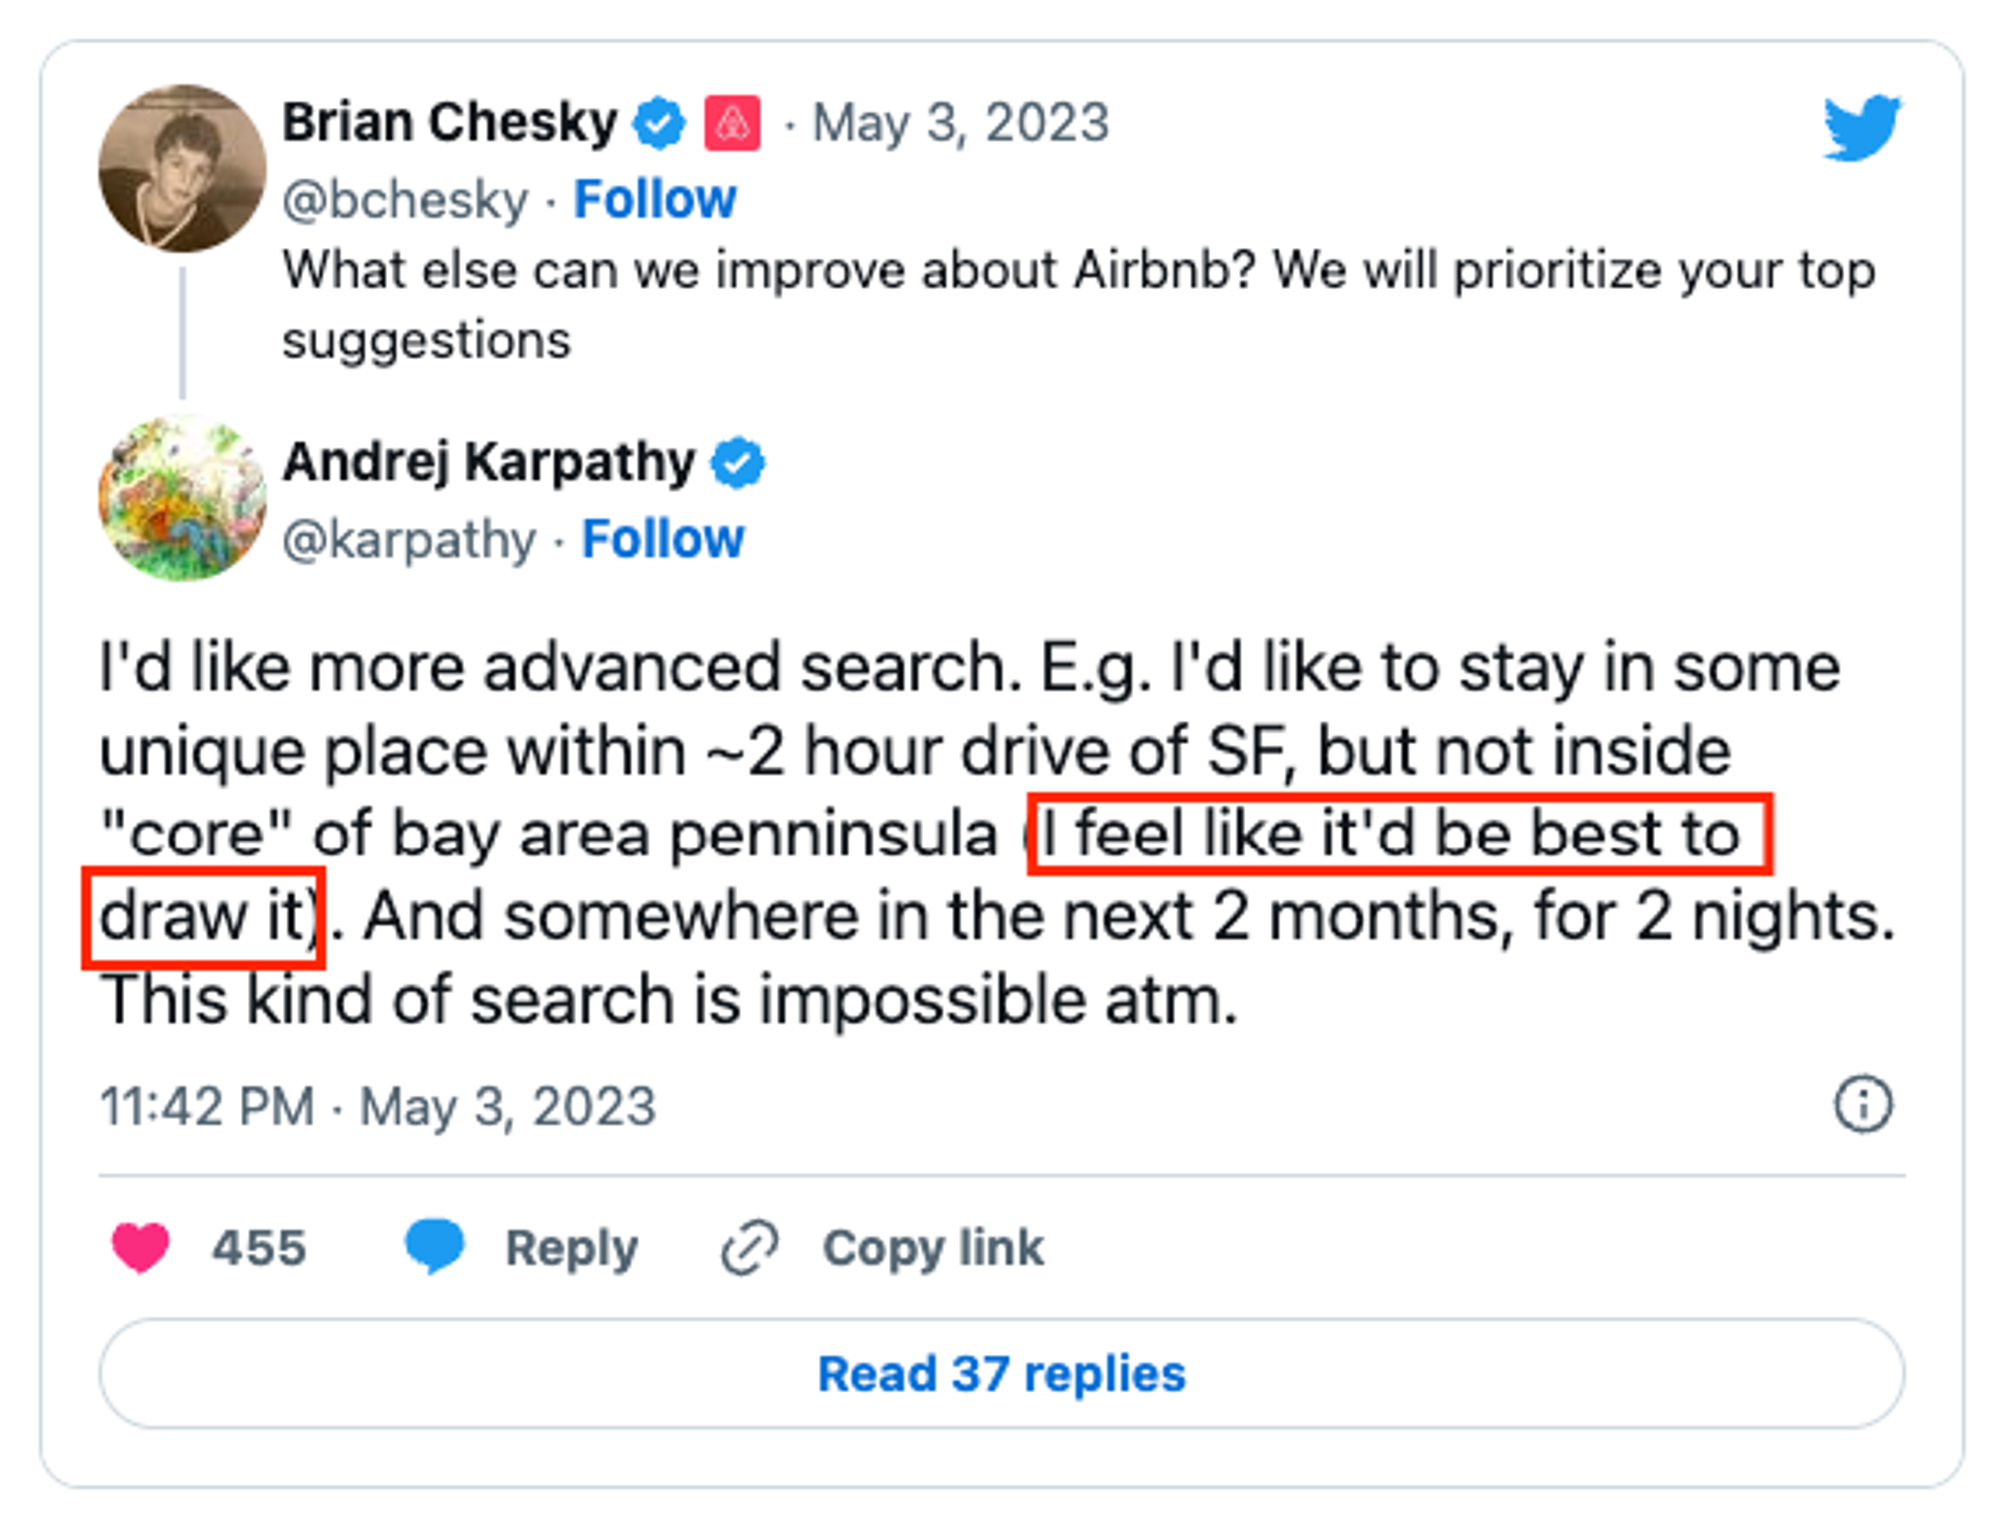
As a matter of fact, being able to draw as part of an advanced search is one of the top community feature requests at Airbnb:
Now, implementing user-friendly map drawing capabilities is daunting but not impossible.
In this chapter you’ll learn how to A) work with Google Maps’ Drawing Library and B) implement a custom, self-closing, freehand drawing tool.
Google’s Drawing Library
To use Google’s Drawing Library (i.e. the
google.maps.drawing.DrawingManager class), you’ll first need to load this library as part of your initialization script:< script async defer
src=".../maps/api/js?key=YOUR_KEY_STARTING_WITH_AIza&libraries=drawing&callback=initMap">
From there, you can create a
DrawingManager instance that’ll look like this by default:
MARKER, CIRCLE, POLYGON, POLYLINE, and RECTANGLE drawing modes.To limit the drawing modes to e.g. only polygons, specify the
drawingModes parameter.To define the initial drawing state of the manager, set the
drawingMode parameter.const drawingManager = new google.maps.drawing.DrawingManager({
map,
drawingControlOptions: {
drawingModes: [google.maps.drawing.OverlayType.POLYGON],
},
drawingMode: google.maps.drawing.OverlayType.POLYGON,
polygonOptions: {
editable: true,
draggable: true,
},
}));The drawback of the default drawing manager is that it is not easily customizable — the buttons are too small, there’s no “delete” button, etc.
The good news is, the drawing manager’s functionality can be reused to create aesthetically pleasing and functional drawing tools:
Let’s break that down.
The “pencil” button & mouse cursor
Our pencil button will be a traditional HTML <button> element
<button id="pencil"></button>#pencil {
position: absolute;
appearance: none;
border: none;
border-radius: 2px;
width: 36px;
height: 36px;
background: white;
cursor: pointer;
box-shadow: rgba(0, 0, 0, 0.3) 0px 1px 4px -1px;
background-position: center center;
background-size: 22px;
background-repeat: no-repeat;
top: 12px;
right: 12px;
}whose background is the encoded pencil SVG:
#pencil {
  background-image: url("data:image/svg+xml,%3Csvg width='34' height='34' viewBox='0 0 34 34' fill='none' xmlns='http://www.w3.org/2000/svg'%3E%3Crect x='22.2622' width='12.8898' height='3.50367' rx='1' transform='rotate(43.322 22.2622 0)' fill='%23AC1717'/%3E%3Cpath d='M4.57277 21.7427L2.85168 30.8399C2.6367 31.9763 3.73422 32.9181 4.82477 32.5332L13.1844 29.5828C14.2488 29.2071 14.5325 27.8346 13.7042 27.0677L7.06574 20.9209C6.20058 20.1199 4.79196 20.5842 4.57277 21.7427Z' fill='%23E7C3B4' stroke='%23E3B495'/%3E%3Cpath d='M4.89312 20.1657L5.28403 20.4758L17.841 4.64311C18.0194 4.41812 18.3503 4.38932 18.5649 4.58011L27.5472 12.5644C27.7518 12.7462 27.7721 13.0587 27.5929 13.2656L14.4498 28.4307C14.272 28.6358 13.9349 28.5101 13.9349 28.2386C13.9349 27.5244 13.3559 26.9454 12.6417 26.9454H10.1945C9.95004 26.9454 9.74145 26.7687 9.70126 26.5276L9.39585 24.6951C9.27531 23.9718 8.64952 23.4417 7.91626 23.4417H5.67578C5.39963 23.4417 5.17578 23.2179 5.17578 22.9417V20.7865C5.17578 20.6737 5.21393 20.5642 5.28403 20.4758L4.89312 20.1657Z' fill='%23F5AF00' stroke='%23EEA502'/%3E%3Cpath d='M2.07456 33.6272L2.88261 29.587C2.92206 29.3897 3.19534 29.3676 3.26599 29.556L3.99754 31.5068C4.02365 31.5764 4.08622 31.6258 4.16 31.635L6.02763 31.8685C6.23008 31.8938 6.26914 32.1704 6.08161 32.2507L2.34946 33.8502C2.20145 33.9137 2.04298 33.7851 2.07456 33.6272Z' fill='%23696969' stroke='%234D4D4D' stroke-width='0.6'/%3E%3Cpath shape-rendering='geometricPrecision' d='M7.1 23.8L21.38 6.8' stroke='%23EBA000'/%3E%3Cpath shape-rendering='geometricPrecision' d='M10.5 27.2L25.46 10.2' stroke='%23EBA000'/%3E%3Crect x='19.9264' y='1.16789' width='15.1826' height='3.50367' rx='1' transform='rotate(43.322 19.9264 1.16789)' fill='%23D9D9D9'/%3E%3C/svg%3E%0A");
}
This SVG icon, when converted to a PNG, can be used as a mouse cursor image when the user hovers their mouse over the map canvas:
#map.will-draw {
	/* Though the pencil image is 32x32px, safari won't render the cursor position correctly
     unless it's ever-so-slightly less than that.
     See https://stackoverflow.com/a/35243428/8160318 */
	cursor: url(https://.../pencil.png) 3 31, crosshair !important;
}In reality, the CSS selector will be a bit more complicated than just
#map.will-draw:#map.will-draw .gm-style div + div,
#map.will-draw .gm-style div div div div {
cursor: url(https://.../pencil.png) 3 31, crosshair !important;
}.gm-style class look familiar? We talked about it in Custom Info Windows.Now, the trick is to dynamically toggle the
.will-draw class when the pencil button is clicked:const toggleMapCls = () => {
document.getElementById('map').classList.toggle('will-draw');
};
const handlePencilClick = () => {
toggleMapCls();
// more logic later on ...
};
document
.getElementById('pencil')
.addEventListener('click', handlePencilClick);The “trash” button
Once the “pencil” button is set up, we can move onto the “trash” button.
The idea is to:
- Keep showing the “pencil” button while the user draws their polygon.
- Hide the “pencil” button after the polygon is finished and show the “trash” button.
- Once the “trash” button is clicked, the polygon is removed and the “pencil” button reappears.
In terms of styling, both buttons are equal, except for the background SVG icon :
<button id="trash" hidden></button>#pencil,
#trash {
position: absolute;
appearance: none;
border: none;
border-radius: 2px;
width: 36px;
height: 36px;
background: white;
cursor: pointer;
box-shadow: rgba(0, 0, 0, 0.3) 0px 1px 4px -1px;
background-position: center center;
background-size: 22px;
background-repeat: no-repeat;
top: 12px;
right: 12px;
}#trash {
background-image: url("data:image/svg+xml,%3Csvg xmlns='http://www.w3.org/2000/svg' width='24' height='24' viewBox='0 0 24 24' stroke='none' stroke-linecap='round' stroke-linejoin='round' fill='none' shape-rendering='geometricPrecision' preserveAspectRatio='xMidYMid meet' style='vertical-align: top;'%3E%3Cpath fill='%23FF0000' d='m1.65139,6.0885l0,-1.47806a1.47806,1.47806 0 0 1 1.47806,-1.47806l5.90927,0a2.95611,2.95611 0 1 1 5.91222,0l5.91961,0a1.47806,1.47806 0 0 1 1.47806,1.47806l0,1.47806l-20.69721,0zm2.21413,2.95611l16.25861,0l-0.66808,13.3764a1.47806,1.47806 0 0 1 -1.47806,1.40415l-11.96634,0a1.47806,1.47806 0 0 1 -1.47658,-1.40415l-0.66956,-13.3764z'/%3E%3C/svg%3E");
}const toggleTrashVisibility = () => {
document.getElementById('trash').hidden =
!document.getElementById('trash').hidden;
};
const togglePencilVisibility = () => {
document.getElementById('pencil').hidden =
!document.getElementById('pencil').hidden;
};
const handleTrashClick = () => {
toggleTrashVisibility();
togglePencilVisibility();
// more logic later on ...
};
document.getElementById('trash')
.addEventListener('click', handleTrashClick);The invisible DrawingManager
Now comes the fun part. We can instantiate the
DrawingManager and hide it from the UI by setting the drawingControl property to false:const initPencilDrawing = () => {
const drawingManager = (window.drawingManager =
new google.maps.drawing.DrawingManager({
map: window.map,
drawingMode: google.maps.drawing.OverlayType.POLYGON,
drawingControl: false,
polygonOptions: {
editable: true,
draggable: true,
},
}));
drawingManager.addListener('polygoncomplete', handlePolygonComplete);
};Notice that we’re storing the
drawingManager on the global window object for easier access throughout the app. To safely access this foreign prop in Typescript, we’ll declare a global interface and store the map and drawnPolygon for later use as well:declare global {
interface Window {
map?: google.maps.Map;
drawingManager?: google.maps.drawing.DrawingManager;
drawnPolygon?: google.maps.Polygon;
}
}